You can specify a patient's default dental insurance claim settings as needed. When a new dental insurance claim is created, Dentrix Enterprise uses the patient's default settings for that claim.
Notes: Editing appointments requires the "Appointments, Edit" security right.
To change a patient's default dental insurance claim settings
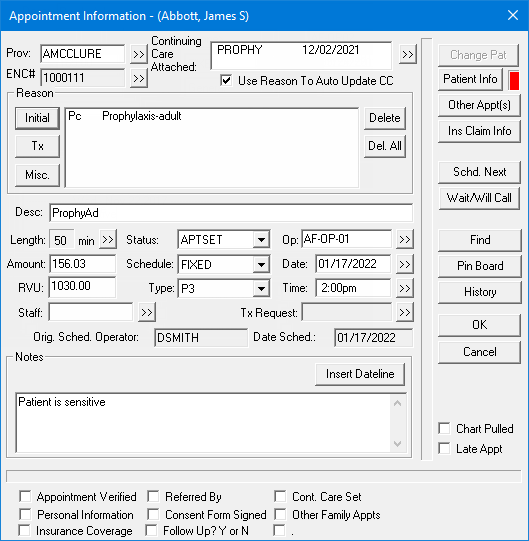
In Appointment Book, double-click an appointment.
Note: If the current Appointment Book view includes operatories for multiple clinics, you can open the appointment only if the appointment was scheduled in an operatory of the clinic that has been assigned to the current view.
If applicable, do one of the following:
If the Password - Appointments, Edit dialog box appears, user verification has been assigned to the "Appointments, Edit" task. Do one of the following:
If your user account has been granted the "Appointments, Edit" security right, enter your credentials in the User ID and Password boxes, and then click OK.
If your user account has not been granted the "Appointments, Edit" security right, have a user with permission temporarily override this restriction so you can edit the appointment this one time. The overriding user enters his or her credentials in the User ID and Password boxes and then clicks OK.

If a message appears, informing you that you do not have rights to this operation, your user account has not been granted the "Appointments, Edit" security right. To have a user with permission temporarily override this restriction so you can edit the appointment this one time, do the following:
On the message, click Yes.

In the Password - Appointments, Edit dialog box, the overriding user enters his or her credentials in the User ID and Password boxes and then clicks OK.

The Appointment Information dialog box appears.

Click Ins Claim Info.
The Default: Insurance Claim Information dialog box appears.

Change any of the following options as needed:
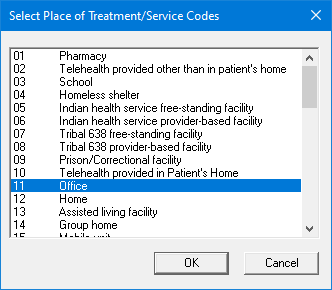
Place of Treatment - Where treatment is usually performed. To change the default place of treatment for this patient, do the following:
Click the Place of Treatment search button  .
.
The Select Place of Treatment/Service Codes dialog box appears.

Select a place of treatment.
Click OK.
Notes:
You can customize the list of places of treatment in the Medical/Cross Code Setup dialog box.
You can change the default place of treatment for your organization. Also, you can override the organization-level default place of treatment per clinic.
Pre-Authorization Number - The pre-authorization number for a pre-treatment estimate.
First Visit Date Current Series - The first date of service (in a mm/dd/yyyy format) for a series of treatments.
Note: Dentrix Enterprise automatically adds slashes to dates when you enter six or eight numbers (mmddyy or mmddyyyy) and then press the Tab key.
Original Reference Number (#) - The original reference number for a voided or resubmitted Medicaid claim.
Student Status - To specify that the patient is enrolled in school (college, university, and so forth), select one of the following options: None, Part-Time, or Full-Time. If the Part-Time or Full-Time option is selected, enter the school and city in the School - City box.
Attachments - Claim attachments. Set up the following options as needed:
Radiographs(s) Enclosed - If you attach radiographs, select this checkbox. With this checkbox selected, enter the number of radiographs in the corresponding How Many? box.
Oral Image(s) Enclosed - If you attach oral images, select this checkbox. With this check box selected, enter the number of oral images in the corresponding How Many? box.
Model(s) Enclosed - If you attach models, select this checkbox. With this checkbox selected, enter the number of models in the corresponding How Many? box.
Other Attachments - If you include another type of attachment, select this checkbox.
Insurance Ref # - If any of the aforementioned checkboxes are selected, this box is available. Enter a reference number.
Disabled - If the patient is disabled (work-related or not), select this checkbox.
Occupational Illness or Injury - If treatment is necessary due to a work-related injury or illness, select this checkbox, and then enter the date (in a mm/dd/yyyy format) and description of the injury or illness in the corresponding Dates and Descriptions boxes.
Note: Dentrix Enterprise automatically adds slashes to dates when you enter six or eight numbers (mmddyy or mmddyyyy) and then press the Tab key.
Auto Accident - If treatment is necessary due to an automobile accident, select this checkbox, and then enter the date (in a mm/dd/yyyy format) and description of the accident in the corresponding Dates and Descriptions boxes.
Note: Dentrix Enterprise automatically adds slashes to dates when you enter six or eight numbers (mmddyy or mmddyyyy) and then press the Tab key.
Other Accident - If treatment is necessary due to an accident that was not automobile-related or work-related, select this checkbox, and then enter the date (in a mm/dd/yyyy format) and description of the accident in the corresponding Dates and Descriptions boxes.
Note: Dentrix Enterprise automatically adds slashes to dates when you enter six or eight numbers (mmddyy or mmddyyyy) and then press the Tab key.
Services Covered by Another Plan - If treatment can be covered by another insurance plan, select this checkbox, and then enter a description in the corresponding box.
Prosthesis - Select one of the following options:
No - If a prosthetic device is not required for treatment.
Initial - If a prosthetic device is required for treatment and is the first prosthesis. With this option selected, in the Date Ordered box, enter the date (in a mm/dd/yyyy format) that the device was ordered.
Note: Dentrix Enterprise automatically adds slashes to dates when you enter six or eight numbers (mmddyy or mmddyyyy) and then press the Tab key.
Replacement. - If a prosthetic device is required for treatment and is a replacement prosthesis . With this checkbox selected, specify the following information:
Date Ordered - Enter the date (in a mm/dd/yyyy format) that the prosthesis was ordered.
Note: Dentrix Enterprise automatically adds slashes to dates when you enter six or eight numbers (mmddyy or mmddyyyy) and then press the Tab key.
Replace Reason - Enter the reason that the prosthesis is being replaced.
Prior Date - Enter the date (in a mm/dd/yyyy format) that the previous placement of the prosthesis was done. Also, if the date is an estimate, select the Estimated checkbox.
Note: Dentrix Enterprise automatically adds slashes to dates when you enter six or eight numbers (mmddyy or mmddyyyy) and then press the Tab key.
Orthodontic Treatment - For orthodontic treatment, select this checkbox, enter the date (in a mm/dd/yyyy format) that the orthodontia was initially put in the patient's mouth in the Placement Date box, and enter the number of months until the existing orthodontia will be removed from the patient's mouth in the Mos. Remain box.
Note: Dentrix Enterprise automatically adds slashes to dates when you enter six or eight numbers (mmddyy or mmddyyyy) and then press the Tab key.
For Special/Medicaid Claims - The following options are for Medicaid or special claim forms:
Referring Prov - In the box, enter the referring doctor's name.
Reason for Pre-Auth - The reason for the pre-authorization. Select one of the following options: Required or Services Exceed Max.
Service Authorization - Exception Code - From the list, select an exception code or <NONE>.
90-Day Indicator - From the list, select an indicator or <NONE>.
Other options - Select any of the following checkboxes that correspond to conditions that usually apply to claims: Oral Surgery, Special Case/EPSDT, Medicare, Eligibility Pending, Retroactive Eligibility, Re-Evaluation, CHDP, and/or CCS).
Other Subscriber Information:
Remaining Patient Liability Amount - Not available (for secondary insurance claims only).
Total Non-Covered Amount - Not available (for secondary insurance claims only).
Primary Claim Adjustment Reason(s) - Not available (for secondary insurance claims only).
HSN - If the payor ID entered for the insurance plan is "MCMA1" or an HSN payor ID from Change Healthcare, this button is available. To enter HSN information, do the following:
Click the button.
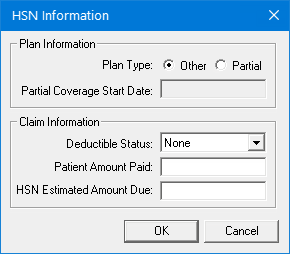
The HSN Information dialog box appears.

Set up any of the following options:
Plan Information - Next to Plan Type, select the Full option if the patient has full coverage or the Partial option if the patient has partial coverage. With the Partial option selected, in the Partial Coverage Start Date box, enter the date (in a mm/dd/yyyy format) that the patient’s coverage started.
Note: Dentrix Enterprise automatically adds slashes to dates when you enter six or eight numbers (mmddyy or mmddyyyy) and then press the Tab key.
Claim Information:
Deductible Status - None, Open, or Met is selected by default according to the status of the deductible that applies to the claim, but you can select a different status.
Patient Amount Paid - In the box, enter the amount (up to 99,999,999.99) that the patient has paid for the procedures included on the claim.
HSN Estimated Amount Due - In the box, enter the total estimated amount (up to 99,999,999.99) that is due from the patient for the procedures on the claim.
Click OK.
Note: To reset all the options in the Insurance Claim Information dialog box to their default settings, click Clear. A confirmation message appears, reminding you that the claim information will be cleared for this claim and any other claims that include the procedures on this claim. Click OK.
Click OK.